Apache Solr is a highly scalable search engine with lots of goodies inbuilt. In this guide we will learn how to get our structured data in XML can be indexed and searched effectively.
We will learn the following concepts:
- Starting up Apache Solr
- Importing structured XML document for indexing in Apache Solr
Tools & Library used in this project:
- Apache Solr 5.3.0
- Java 8
- Mac OSX
Downloading & Starting Apache Solr
Download Apache Solr Binary Distribution
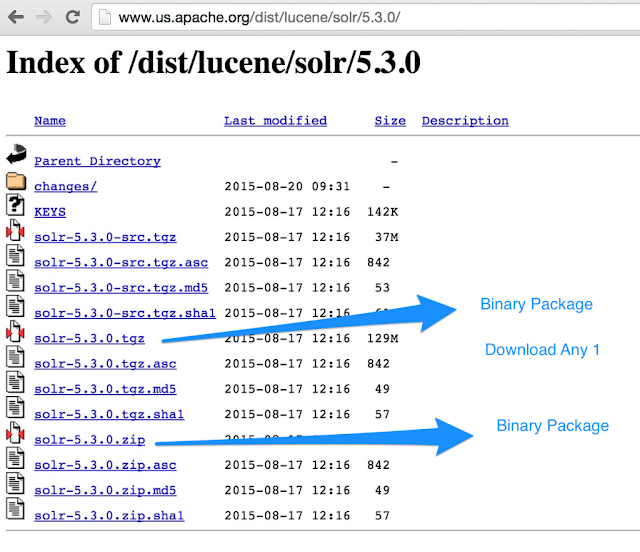
We can download Apache Solr latest version from their official website. When we click on the major or mirror download distribution link, we got a page like it:
Tip: Apache Solr downloadable package size is around 130 MB. Make sure you have this much bandwidth left on your internet connection.
Unpack Apache Solr Binary Download Zip
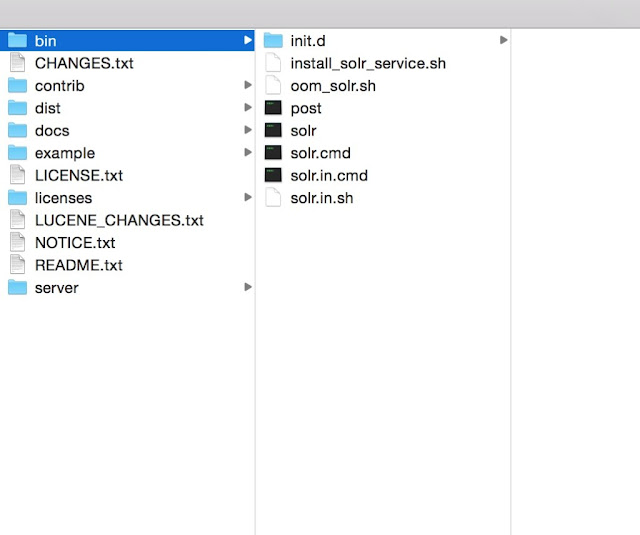
When we unpack Apache Solr Binary Download Zip we see the following files and folders inside the main folder:
Starting, Stopping, and Restarting Apache Solr
Starting Apache Solr Server
$ cd /Volumes/Drive2/App/solr-5.3.0/
Start Solr Server
$ bin/solr start
Apache Solr has been started at https://localhost:8983/solr.
Stopping Apache Solr
$ cd /Volumes/Drive2/App/solr-5.3.0/
Stop Solr
$ bin/solr stop -p 8983
Restarting Apache Solr
$ cd /Volumes/Drive2/App/solr-5.3.0/
Stop Solr
$ bin/solr restart -p
Note: Replace the Solr folder path with your installation path
Let’s create a core (or Collection) “xmlhub”
$ bin/solr create -c xmlhub
Setup new core instance directory: /Volumes/Drive2/App/solr-5.3.0/server/solr/xmlhub
Creating new core ‘xmlhub’ using the command: https://localhost:8983/solr/admin/cores?action=CREATE&name=xmlhub&instanceDir=xmlhub
{
 "responseHeader":{
 "status":0,
 "QTime":874},
 "core":"xmlhub"}
}
## Indexing XML files

### Sample XML File

We will be indexing xml files kept in a folder (In our application its at _<solr_installtion_root_dir>/example-data_). An example of a XML file content:

**File: example1.xml**
```xml
<?xml version="1.0" encoding="UTF-8"?>
<ele xmlns:dc="https://purl.org/dc/elements/1.1/">
<attr1>
  Atrr1 Value 1
</attr1>
<attr2>
  Attr2 Value 1
</attr2>
<meta property="meta1">
  Meta 1 Val 1
</meta>
<meta property="meta2">
  Meta 2 Val 1
</meta>
<meta name="name1">
  Name 1 value 1
</meta>
<meta name="name2">
  Name 2 value 1
</meta>
</ele>
Uploading XML structured data for Indexing using Data Import Handler
Step 1: Configure solrconfig.xml
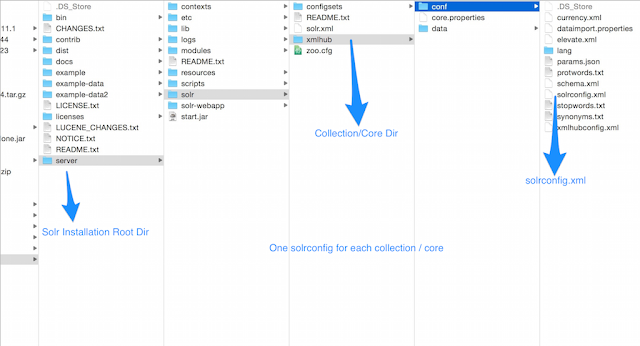
We will find solrconfig.xml file in location <solr_installtion_root_dir>/solr/<collection/node_name>/conf.
File: solrconfig.xml
....
<lib dir="${solr.install.dir:../../../..}/dist/" regex="solr-dataimporthandler-.*.jar" />
....
<requestHandler name="/dataimport" class="org.apache.solr.handler.dataimport.DataImportHandler">
    <lst name="defaults">
      <str name="config">xmlhubconfig.xml</str>
    </lst>
</requestHandler>
...
We can place this code in solrconfig.xml
Step 2: Create Data Import configuration
We may provide data import configuration in solrconfig.xml file, but we choose to do that in external file xmlhubconfig.xml.
File: xmlhubconfig.xml
<dataConfig>
  <dataSource type="FileDataSource"/>
  <document>
    <!-- this outer processor generates a list of files satisfying the conditions specified in the attributes -->
    <entity name="f" processor="FileListEntityProcessor" fileName=".*.xml$" recursive="true" rootEntity="false" dataSource="null" baseDir="/Volumes/Drive2/App/solr-5.3.0/example-data">

      <!-- this processor extracts content using Xpath from each file found -->

      <entity name="nested" processor="XPathEntityProcessor" forEach="/ele | /metadata" url="${f.fileAbsolutePath}" >
              <field column="attr1_s" xpath="/ele/attr1"/>
              <field column="attr2_s" xpath="/ele/attr2"/>
              <field column="meta1_s" xpath="/ele/meta[@property='meta1']"/>
              <field column="meta2_s" xpath="/ele/meta[@property='meta2']"/>
              <field column="name1_s" xpath="/ele/meta[@name='name1']"/>
              <field column="name2_s" xpath="/ele/meta[@name='name2']"/>
      </entity>
    </entity>
  </document>
</dataConfig>
This configuration is specific to the XML file structure. Pay attention to how we had used XPATH. You should also replace baseDir with your path.
Step 3: Configure to generate unique id automatically
In solrconfig.xml we will be using updateRequestProcessorChain to setup UUIDUpdateProcessorFactory to generate a unique UUID for the id column.
File: solrconfig.xml
...
<updateRequestProcessorChain>
      <processor class="solr.UUIDUpdateProcessorFactory">
        <str name="fieldName">id</str>
      </processor>
      <processor class="solr.LogUpdateProcessorFactory" />
      <processor class="solr.RunUpdateProcessorFactory" />
</updateRequestProcessorChain>
...
Index File
We should restart Apache Solr.
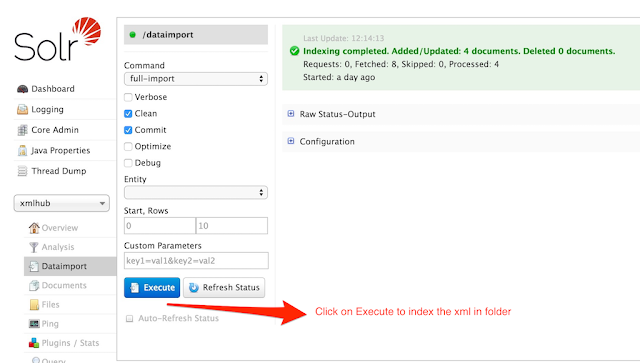
Go to https://localhost:8983/solr/#/xmlhub/dataimport//dataimport:
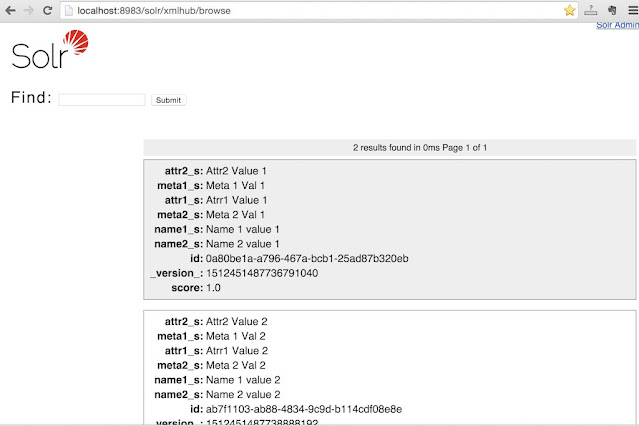
It will index the XML files and create documents. You can browse the document at https://localhost:8983/solr/xmlhub/browse.
Using the built-in collection browser we can search indexed documents. Learn more about Solr Query Syntax at the official documentation. Apache Solr also provides API to access search interfaces with all the available features.
References
- Learn about the Apache Solr Query Syntax
- Apache Solr Data Import Helper Documentation
- Apache Solr Site
